Thursday, April 26, 2012

The password is....

This weeks project for me was a password book. I do have a place for my passwords, but I didn't where they were kept. its all about recycling in this project! Earth day was this past Sunday after all! :P


The covers started off as a box that I had gotten a RAK in. I cut it down so I could reuse the pieces for book covers or whatever on projects. I took 2 pieces of that and measured for the covers in 6 x 4. I also took some of my old jeans that I had cut up to use for the covers.


After I cut the corrugate to size I glued one of the pieces and put the piece on the denim. cut the denim leaving a bit of a border around it. I cut the corners. I took some Miracle tape around the edges and also some glue to make sure the fabric will stay put once put down when I fold the denim down onto the corrugate. 

After that I cut some decorative cardstock for the inside covers. I LOVE retro, and I had just gotten the Retro Collage from recollection, so I wanted to use it. I added some lace on the front cover that I had in my stash and some pink cotton trim that I had gotten in a RAK I wanted to use. I punched some holes with my crop-a-dile for binder rings.


On white cardstock I stamped screaming lady and I used to have a life now i have e-mail stamps with black memento ink pad. I colored the lady with color pencil. And used Worn Lipstick distress ink pad around the edges, after I cut it with a decorative edge scissors. I went down to look through my Scrabble tiles to find the letters to spell out password. I found all the letters but the 'W' So I took the 'M' and use turned it upside down to make it a 'W'. LOL 


As for the papers I used for writing the passwords on I used old paper that was in a spiral notebook. but i cut it wrong! LOL So i took a bunch of paper from a yellow tablet and cut it the write way! punch holes and out them in the book.


Don't forget that This month card challenge is "Earth day" there is still time (like 4 days LOL) to make a card and post it on your blog and link it up to the Viva Las Vegastamps! blog. You might win $25 for the Viva Las Vegastamps! store! :)

Link Up Blog Hop


The Viva Las Vegastamps! Design Team is having a blog hop on May 26th and we want you to play along with us..  oh, and the best part is Mary Vogel Lozinak is joining us in this hop, too..  How exciting to have the artist herself!!

Here is how it's going to work....
1)  Make a project using Mary Vogel Lozinak stamps
2)  On May 26 or 27th, come back to this blog and link your Mary Vogel Lozinak project to our linky.
3)  All those who enter will have a chance to win $25 to the Viva Las Vegastamps! on-line store. 

.. In addition each Design Team member for VLVS! Will have $10 to give away to one lucky commenter on their blog, as well as ANOTHER $25 to one lucky commenter on the VLVS! Blog. 

So... Get out your Mary stamps.. get to creating.. and be ready to link up on the 26th of May!!! 

General participation is requested :) Visit the blogs and check out these beautiful stamps in action!! We can't wait for you to join us!!! 

Tuesday, April 24, 2012

Sparkle with Hand-Mixed Embossing Powder!

Happy Wednesday! Today I bring you one of my favorite new stamps from the Mary Vogel Lozinak collection on Viva Las Vegastamps! plate 1398. The Peacock and the "Don't let anyone ever dull your sparkle" really make me smile! I wanted to experiment with making Terri Sproul's Mixers--mica powders--into Embossing Powders with the Ultra High Gloss Embossing Powder. I hope you find my experiment useful and that you enjoy my sparkle 

For this project you will need:

Gear Embossing Folder
Miscellaneous Gear Hardware
Versamark Embossing Pad
Coredinations Cut & Emboss Series Glitter Stacks
I began by mixing Terri Sproul's Mixers to Ultra High Gloss
Embossing Powder 1 to 2.
The results left the test strips [pieces of Miracle Tape embossed
with my new mixed powder] interesting but not the effect I was
going for...I needed more product melting.
So, I moved to a larger container and added one more scoop
of Ultra High Gloss Embossing Powder making the ratio 3 to 1
EP to Mixer.
This creates the desired effect!
I really liked the bronze and the Shimmer Aquamarine on the
the Mary Vogel Lozinak Peacock. I targeted the colors of
embossing powder exactly where I wanted them. I likewise
did this same technique on a white piece of cards tock--which
ultimately ended up on my card. 
After trimming out the embossed black peacock I decided I
preferred the one stamped on the white. I will save this pretty
fella for another day.
For an added card feature, I dry-embossed a piece of black card
stock with a folder, swiped it with the versamark pad and dusted
straight bronze and tanzanite mixers onto the raised areas.
The  sentiment was stamped on white card stock. Both white
pieces were matted with Bronze Glitter paper. The gears were
painted with Sakura 3D Crystal Lacquer and Terri's Mixers
to give the extra color.

Thank you for looking and remember: "Don't let anyone ever dull your sparkle!" [I feel very RuPaul when I say that!]

Don't forget right now you can get FREE SHIPPING on Viva Las Vegastamps! orders...check out our April Newsletter to learn how! Sign up! You won't want to miss an exciting edition!

April Newsletter - FREE Shipping

Read our April Newsletter to update yourself on the latest happenings at Viva Las Vegastamps!  Our April Newsletter has a coupon for FREE Shipping.
Click for April Newsletter

Monday, April 23, 2012

Let's IRON out a few issues......

There are only a few household chores that I dread..... vaccuming and ironing. 
With that said, I love being a SAHM.  
My hubs loves that I do a great job keeping the household running smoothly.....
and CLEAN!!!
Bwahahahahahahahahahahaha!!!!


Don't ya love this.....I do!!!
This has to be my expression on my face when I feel the dread of any 
impending ironing looming over my head....
and I'm probably thinking that very thought too.
Bwahahahahahahahahahahaha!!!

I going to hang this in my laundry room and maybe it'll give me a *giggle" 
when I have actual ironing to do.

Deets:

First I went looking in my studio for something of a household nature to use as the base.
I found a balsa wood ironing board....perfect.
I then, covered it with some thin batting and then this gorgeous black gingham.
I added some cotton cord on the back for a hanger and then added the peachy/pink 
card stock to the backside to cover up the fabric ends.
I found this peachy/pink floral fabric and cut a small rectangle and used and adhered it to the top of the ironing board at an angle and gathered a little. 
I used a piece of metal from a soda can and made a makeshift iron using a paper piercer and a stylus to emboss the edges a bit. 
Then stamped the lady's face stamp onto the same peachy/pink card stock using black ink and blushed up her cheeks with some chalk. I used a white gel pen to highlight her eye a wee bit also.
Stamped the sentiment and used coordinating oval punches.

Supply List w/ links:

The stamps can be purchased here......

The rest of the items were in my stash of 'schtufffff ' as my hubs sso lovingly call it.
Bwahahahahahahahahahahaha!!!

Until later, jokesters.......Gotta split.....TFL!!!!!!!
Photobucket

Saturday, April 21, 2012

NEW PLATES!!

Check out the Promotions Tab to see our 10 brand new plates -- follow the link there to get them 20% off the regular price!!


See new Mary Vogel Lozinak - new PEOPLE - new STEAMPUNK..

and a brand new PSX Inspired board with lovely vintage images of flowers and their Latin names!

Thursday, April 19, 2012

A Titanic Relic

Picture it…

December, 1997.

Mike Tyson bites off Evander Holyfield’s ear, Tiger Woods becomes the youngest person to ever win the Master’s and the first Harry Potter book is released.

All of that pales in comparison to one thing – TITANIC.

Ohhhh yes, you remember the first time you saw it on the big screen. You were snuggled up to your Honey, holding your breath as long as you could and even though you KNEW what was going to happen, you sill CRIED your eyes out!!!!
And I’m willing to bet if you go see it in theaters again when it is re-released, you will cry this time too :)

With this in mind, I popped in my copy of Titanic and got to work.

In honor of Titanic I created this card using my VivaLasVegaStamps! All of the stamps I used on this project came from plate 1337, which is FULL of ATC art doll images. I used three of the faces, two different sizes of the fan , two sizes of mirror and one of the hats. This is a very versatile plate with multiple sizes of the same images which can be used together for a fun look.


I found some Titanic memorabilia online, sized it in a Word document and printed it in copy paper. I made the card by cutting a manila envelope into fourths and cutting off the tab.


I added color with Tim Holtz Distress Inks in tea dye, tattered rose, mustard seed, black soot and vintage photo and stamped my three lady images with black soot.


Next I glued my memorabilia to the card using gel medium.


I stamped on the fans, mirrors and hats using rusty hinge Distress Ink and then embossed all of them with VivaLasVegaStamps! Ultra High Gloss Embossing Powder . Using a white Gelly Roll pen, I added some text about Titanic and a few quotes from the movie.


I thought I was finished with the card at that point, but then it seemed to me that this could have been a journal or scrapbook page one of the passengers may have made to remember that extraordinary voyage. (I actually JUST had that idea about 10 seconds ago!)
I decided to age the card and make it look like it had been sunken and buried with the wreckage for all these years, only to be discovered for this blog post :)

I submerged the entire card in a tea bath (it is soaking right now) and I will let it soak overnight. I will finish this post tomorrow.

(It is now the next day) –

I took the card out of the tea bath and put it in the oven to let it dry completely. Well, I kinda forgot about it and it ended up staying in the oven for about an hour. When I pulled the card out, it had completely curled up and all of the embossing melted off... BUT, I LOVE the finished project!!!


I laid it out with some heavy books on top, so it’s not quite so curled up, but it is still warped, the ink has run and the ‘missing’ embossed spots actually turned out looking like a resist. I think I accidentally ended up with the exact look I was going for :D I feel like this really looks like it could be a relic from the Titanic so I am THRILLED!

You can view more of my art on my blog.

Tuesday, April 17, 2012

Steampunk ATC for Swap!

What is a SWAP you ask?  Swaps are organized trading sessions.  Many have a theme. Swaps can be done face to face or through the mail.  If they are done through the mail a host collects all the cards and redistributes them. The host can add rules to the swap as s/he deems necessary.  Like how many to make, must have stamping, at least one embellishment, a mailing deadline just to name a few!
So what is an ATC?  The only steadfast rule to follow when creating an ATC is it MUST measure 2.5” x 3.5” the size of traditional baseball trading cards.  I love trading ATC’s, particularly when the theme is STEAMPUNK.  

Currently, I am hosting a STEAMPUNK ATC swap and I just traded the cards among the participants and the envelopes are ready for tomorrows mail.  I got a little carried away with my ATC and made a little book.... THIS is the ATC I made for the swap.  It is a little extravagant... then I had to try out the Hinge Tape.  Have you seen the HINGE TAPE at Viva Las Vegastamps!  Well that is what I used to put my ATC “book” together.  
My base card is double the size 5” x 3.5” and folded in the middle.  Then I cut an inside piece 2.5” x 3”.  To attach the middle page I used one hinge from the Viva Las Vegastamps HINGE TAPE.  I carefully cut the excess tape away, leaving only the hinge.  Then very carefully lined it up on the two pieces of card stock and applied the hinge! EASY PEASY! 

ALL stamps used on the ATC are from Viva Las Vegastamps!
Front: Victorian Balloon
Inside front: Paris Grunge, only lady from the Steampunk Couple stamp, 
Middle page front side: Flying BirdRound Top Bird Cage and “STEAMPUNK IT!”
Middle page back side: “May the Steam be with You!”
Background on all pages: Nesting Gears 
Foreground stamped with Stewart Superior Memories Black or Madonna Blue 
Backgrounds stamped with Versafine Crimson Red 
Papers are from my stash 
Victorian Balloon“STEAMPUNK IT!” and “May the Steam be with You!” were stamped on sewing tissue then adhered to the ATC

Shhhh don’t tell anyone I am showing you my ATC  before the swappers get it in the mail!!!  
Did you know Viva Las Vegastamps! has a forum?  If you think you would like to try a swap, I have set up a STEAMPUNK SWAP called Lyneen’s Steampunk Swap... the rules are in the forum.  Become a member of the forum and post on my Swap that you would like to join.  You have until May 5th to join and June 1st to mail them! EVERYONE who participates in the swap will get a special ATC made by me!
  

Now for my Steampunk Tape surprise... 

STEAMPUNK TAPE MAN!!!

Don’t you think he would look great on a kids party invitation?????  
THE SKY IS THE LIMIT... CREATE with tape!! 


Thanks for stopping by, hope you join my Steampunk Swap!  Remember you have until the end of the month to participate in the monthly challenge go HERE for details.  

If you have time stop by my blog  Dreaming of Castles for more inspiration!

Monday, April 16, 2012

Earth Day & Refreshing My Creativity with Viva Las Vegastamps!

We've all been there.

I wondered how I could explain this Earth Day card without seeming to be whining, and I realized--We've all been there.

Life happens and projects that were meant to be spaced out over time all end up in a rush to be done. You're trying to accomplish oh-so-many things and suddenly you go to work on a project and the creative inspiration just isn't there. You are tapped out.

This occurred with my project for my second Design Call for Viva Las Vegastamps! (VLVS) so I looked for a way to make it a positive thing. I decided to make this as much a tutorial for winding up the wellspring of creativity, as for making a card.

You often hear about creativity being an attitude or perception of the mind. I've often found creativity is in my hands. Literally. If I turn off my brain, and just start working, good things happen. I make decisions on the spot, based on what is happening at the moment. I also decide not to critique my work because when you are tapped out, nothing looks good. I'm often surprised when I go back and look at work done when I'm in this mood. It is so much better than I thought it was when I did it.

Usually I incorporate Zentangle-Inspired art into my projects but I was already working on a stamping project using patterns (which you'll see in my giveaway post, also posted today), so I decided to go a different direction for this project. I wanted to stretch myself in different directions--open myself up to combat the desire to shut down.

Supplies:

Animal Tree stamp from Viva Las Vegatamps!
Piece of white cardstock big enough for stamp
Lyra Rembrandt Colored Pencils
8x8 in textured cardstock map from DCWV's The Travel Stack
8 1/2 x 11 black cardstock
1 1/2 x 4 inch white cardstock for 'Earth Day'
Terri Sproul's Mixers - Orange Pearl
Terri Sproul's Mixers - Green Pearl
Miracle tape (demonstration video for lots of ways to use Miracle tape)
Stewart Superior Memories Inkpad-black
Black Sharpie Marker

Theme
Normally, I don't look for prompts or challenges, but this time I needed a direction. The Viva Las Vegastamps! challenge theme for April is 'Earth Day'. (The prize is a $25 gift certificate for the VLVS store. I'm not eligible, but you probably are--check it out!) This gave me a 'theme' and I immediately knew which stamp I wanted to use. I had my start.

The Logo
I wrote out 'Earth Day' on piece of white cardstock and painted the words with Orange Pearl mixers. I had intended to cut the characters out individually, but then the phone rang, and I had to leave, and there was another day gone. To save time, I decided to paint around the words with Green Pearl mixer.

The Stamp

This stamp was part of the lb of stamps I received for my first design team supply delivery. I'd been mulling ideas for using it, and it seemed perfect for Earth Day. I wanted to send a message about dwindling animal habitat, so I decided not to use the chimp carrying a ladder because it adds humor, and dwindling animal habitat isn't humorous. (I'd love to know the story behind this stamp, though). When I inked up the stamp, I took care not to ink that portion.

I stamped the image on white cardstock. It made me think of drawings in old vintage children's books, so I grabbed my colored pencils for soft, tinted colors. The outlines of the stamp are complex and I wanted to use it as a cut-out, so I colored blue sky behind it, and then cut out the image, roughly following the outlines. But when I held it up to the map paper, it didn't stand out enough. So I used Miracle tape to stick it onto black cardstock and again cut it out to create a silhouette behind the image.

The Card
Flipping through my scrapbook papers, I found a 8x8 sheet with a map on it. Bingo! I folded an 8 1/2 x 11 piece of black cardstock in half, folded the map paper in half and taped it down over the cardstock.

After I added the stamp the black didn't 'vibe' enough for me, so I embossed part of it, to give it a shine. I did this by applying Miracle tape to the area I wanted to emboss, sprinkling on the powder, tapping off the excess and then heating the powder that sticks to the tape (follow the video link listed in the supplies for a demonstration showing how that is done).


I brushed the black cardstock with the Green Pearl mixer, on both the embossed and unembossed areas, and when it dried, I stuck the Earth Day logo on the card. I used a Sharpie marker to draw a some texture on the logo portion. And my card was done!


Ahhh! Just the act of creating refreshes me. I feel more in control, and ready to move on to the next project. I hope I've given you some ideas that might help the next time you tap out.

There are lots of prompts and challenges and project tutorials online to help get you going, and I find Viva Las Vegastamps! is one of best sites for me. Each month a new challenge is issued (with gift certificates to the store for prizes!) and new projects are posted three times a week. And if you add the VLVS blinkie to your blog or website, with a link back to www.vlvstamps.com then you'll get a free grab bag of rubber stamps! See the blog sidebar for the requirements and code.


Thursday, April 12, 2012

Hippy Easter!

Hi everyone! This is my first blog post for Viva Las Vegastamps! I am very excited to be part of this team. Viva Las Vegastamps! was one of the first companies I fell in love with when I first started getting into rubber stamping many many years ago.


My first project is a little Easter greeting. I know Easter is over, but I had to make something when I saw the Easter stamp I got in my pound of rubber.


I used a coaster that was from the $1 area at Micheal's that I had in my stash. I have been trying to use up my stash(stamps excluded :P). I made my own background paper with craft paints and a Dollie shaped as an egg shape that I sprayed with some of my sprays. I used Miracle tape to adhere the paper to the coaster. White glue will not work, it came off after the coaster once the glue dried. I stamped the Easter Hippo Coloring Eggs on white cardstock, and colored it with prisma's colored pencils. attached it with Miracle tape to the coaster. 


It still needed something, and I needed to cover a tiny bit of the corner that didn't get cover with the paper. I had recently learned how to make cabbage roses And I thought they would be kinda cool on the piece. I was raked die cut  of the Tattered floral dies and had some extras to make some more. I made 3 sizes for this one. and I hot glued them to a Crystal spray. 


Don't forget to check out the Viva Las Vegastamps! blog. where there are new blog post every Monday, Wednesday and Friday. 


And there is a monthly card challenge where you can win $25 to shop at their store! That can buy you a pound of rubber! :) The theme for April is "Earth day" Just make a card using Viva Las Vegastamps! and post it to your blog then go to our blog to the tap where it says monthly challenge and link your blog post of the card to our blog. :)

Tuesday, April 10, 2012

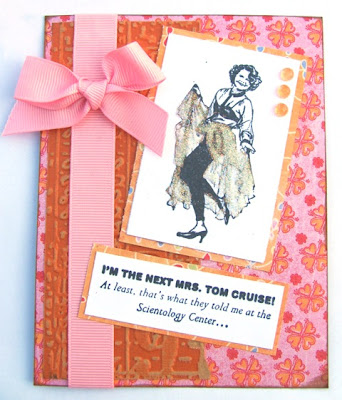
Once, Twice, Three Times a Skipping Lady

Hi Viva Las Vegastamps! fans! My name is leslierahye and I am proud to be a new design team member for this amazing stamp company! I love the diversity of the designs and sentiments offered [by far the largest selection of sentiments that I've ever seen in one place!]. 
For my project today, I wanted to share with you how versatile your stamps from Viva Las Vegastamps! can be!  I recently received a POUND OF RUBBER for $25! In this pound of rubber I received both images and sentiments that I could use for all sorts of crafting--a TON of them! With this my first project I wanted to share how you could take one image--in this case the Skipping Lady-- and create cards for different occasions by merely changing the sentiment--I stopped at 3 examples but the sky is the limit here with so many sentiments to choose from!
For this project you will need from Viva Las Vegastamps!:


Additional Supplies include:
card stock of your choice 
[I used Coredinations papers, Bazzil Basics and Basic Grey]
assorted ribbons, flowers and gems
assorted embossing folders
India Ink by Stewart Superior

Method:
All three cards began the same--I stamped the image on a 2"×3" piece of white card stock with Black India Ink. I then applied Sakura 3D Crystal Lacquer to the dress skirt "overlay". While the crystal lacquer was still wet, I applied a generous sprinkling of Terri Sproul's Mixers Ultra Fine Glitter. The images were put aside to allow the lacquer to dry. 
The sentiments were then stamped with Black India Ink onto white card stock and then trimmed to fit the sentiment. All images and sentiments were mounted on a piece of Basic Grey patterned paper using Miracle Tape to adhere the stamped items to their backings.
The Coredinations card stock was embossed using various folders to match the "intent"--clock for age, swirls for "crazy", reading material-like for Scientology sentiment. In some cases the card base was inked with a brown ink, but that is not necessary.
All embellishments were adhered with Miracle Tape--it is simply amazing for all applications but I LOVE how it holds ribbon! You don't even notice the tape even with the organza ribbons!! The little gems were adhered with crystal lacquer.
Thank you for looking! I hope you enjoyed my cards!

Monday, April 09, 2012

Let's make a deal....

My mom was a game show junkie. 
 She didn't watch soaps, but she watched every, and I mean every,
 game show out there when I was growing up. 

I'm telling my age a bit, but I remember watching "Let's make a Deal" with 
Monty Hall.  As a kid I loved watching that one because of all the
crazy costumes people wore.  
The best part was watching people trade off what they had already won for what was behind the infamous doors 1, 2 or 3.

Sometimes their trading didn't turn out as expected.....but it was very fun to watch.

As soon as I saw this sentiment (#3906) I thought of those fond memories.....
my mom yelling at the T.V. telling the contestants what they should do....
her stopping her household chores long enough to watch the show....
All the while wishing she was one of those contestants.

If my mom was around today I would send her this card
 as a reminder of the fun times we had watching those silly shows.


More details about this card:

Danger sentiment #6172 (stamped onto the DSP)
Card base is baby blue with a black mat and DSP (w/houses) 
I hand cut the cloud and added glitter around the edges.
I adhered it all together using Miracle Tape.
I pop dotted the woman and the cloud. 

This is my first post as a new member of the new
 Design Team of Viva Las Vegastamps!

They have stamps to please any stampers taste buds.

Stop by there and give them a look-see!!!
I've included all the links so you don't have to do a mad search for anything that I have used on this project. Just click on the link and don't forget to peruse around.....!!!

Until later, newbies.......Gotta split.......TFL!!!!
Photobucket

Thursday, April 05, 2012

The Littlest Hat Shoppe

Bonjour!
This is my first Viva Las VegaStamps! Design Team post and can't wait to share it with you.

When I got my first Design Team goodies, I was so excited to see a plate of rubber filled with hats :) I instantly knew I wanted to create a hat shop to display them in! All of the adorable little hats can be found on plate #1115. I used top hat on stand, flowered hat on stand, and flowered veil on stand. I also used decorative frieze for the table.
You can view the full video tutorial below :)

I found a baby board book at my local thrift store and cut out the middle of four pages to create a shadow box in the book. I gessoed everything that would be seen and glued all of the pages together.
Next I painted the entire book using Neocolor II water soluble wax pastels.
I drew the outline of my store front on my cover then painted all of the details using acrylic craft paint.

Using JUST the flowered hat band of the veil , I stamped the flowers onto tissue paper using Distress Ink, then glued them into the flower box and added the finishing touches with paint.
I painted a strip of Titanium Buff acrylic paint, stamped the decorative frieze stamp with Distress Ink and glued them into the cover to serve as the display table.

Next I stamped my  hats on stands onto watercolor paper and painted them using Neocolor II's and glitter gel pens. I attached the hats into the shadow box using puffy adhesive mounts and glued the remaining hats on the display table with tacky glue. Then I went around the edge of each hat with a black marker to give it some depth.
I printed out my text and added color with Distress Inks. I glued the title. Chapeau is French for hat... in case you were wondering ;)
Lastly, I drew a decorative border around the frame of the shadow box with white marker and purple glitter gel pen and around the shop sign with white marker only.

Viola'!The Littelest Hat Shoppe :D
I hope you enjoy this project because I think it is adorable!
You can see more of my work on my blog.
Au revoir!

Tuesday, April 03, 2012

Viva Las Vegastamps! Happy Easter!

Easter is just around the corner.... 
Today I would like to share a new way to use your Viva Las Vegastamps! Miracle Tape with crepe paper to make a ruffle. 
All you need is Viva Las Vegastamps! Miracle Tape and crepe paper. Cut a strip of VLVS! Miracle Tape the length that you would like your finished ruffle.  
Lay the VLVS! Miracle Tape with the protective covering side down and pleat the crepe paper on the sticky side, it doesn't need to be prefect. It took a little practice, after a couple of times it goes quickly.  
If you plan to sandwich the ruffle between two pieces of paper add another strip of VLVS! Miracle Tape to the pleated side. 
Adhere the the ruffle between the pieces of paper by removing the protective covering. 

Stamp images on white card stock and  heat emboss with VLVS! Ultra High Gloss Embossing Powder, add stamped image to the card. 
You can make crepe paper ruffles for a ton of different projects... you are only limited by your imagination.  Be sure to use Viva Las Vegastamps! Miracle Tape! It is the GREATEST TAPE!

Supplies:
Crepe Paper
Pattern Papers
Stewart Superior Memories Black Ink
COPICs - Yellows and Green

Monthly Challenge at Viva Las Vegastamps!This month’s theme is Earth Day Create an Earth Day themed card 
Click HERE for the details to enter.  You will win $25 to our on-line store - HERE is a link to the VLVS! store.  

You will also get your card featured on the Viva Las Vegastamps! blog.  


Please stop by my blog and see more of my projects!
Have a Happy EASTER! ~Lyneen